Recently one of our customers asked about how to implement a conversation display similar to the iOS SMS/Messages display. You can find the BubbleCell sample in our Github repository.
This is what the conversation looks like:

To implement this, I used iOS's UITableView as it already provides a lot of the functionality that we need for this. What I did was to write a custom UITableViewCell that can render bubbles with their text.
I wrote both a MonoTouch.Dialog Element that you can host in your DialogViewController as well as a custom UITableCellView which can be reused by those using UITableViews directly.
This is how you could populate the initial discussion inside MonoTouch.Dialog:
Section chat;
var root = new RootElement ("Chat Sample") {
  (chat = new Section () {
    new ChatBubble (true, "This is the text on the left, what I find fascinating about this is how many lines can fit!"),
    new ChatBubble (false, "This is some text on the right"),
    new ChatBubble (true, "Wow, you are very intense!"),
    new ChatBubble (false, "oops"),
    new ChatBubble (true, "yes"),
  })
};
And this is how you would add a new element to the conversation:
chat.Section.Add (
  new ChatBubble (false, "I want more cat facts"));
Implementation
Bubble rendering is implemented in Bubble.cs and contains both the UITableViewCell as well as the element. It follows the pattern for creating UITableViewCells that I documented before.
Each cell is made up of two views: one contains a UIImageView that paints the bubble and the other one contains the text to render inside the bubble.
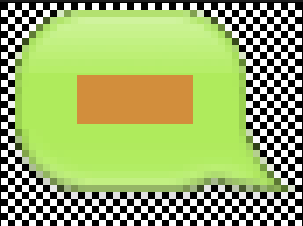
This is what the two bubbles images look like:

We load these using UIImage.FromFile and then use the iOS 5.0 UIImage.CreateResizableImage method to create a UIImage that can be stretched on demand. To create the resizable image we need to tell CreateResizableImage the region of the image that can be stretched. Anything outside of the UIEdgeInset will be kept as-is:
left = bleft.CreateResizableImage (new UIEdgeInsets (10, 16, 18, 26));
right = bright.CreateResizableImage (new UIEdgeInsets (11, 11, 17, 18));
This will stretch the region highlighted in red, while rendering the external border as-is:
With the above code, the image will be rendered in a variety ways depending on the Frame that is assigned to the UIImageView that hosts our resizable UIImage:

The only remaining interesting bit in the code is to configure our UILabel properly. We want to set its BackgroundColor to UIColor.Clear to avoid painting the background in a solid color and we also specify that the text should be word-wrapped if it does not fit in a single line:
label = new UILabel (rect) {
  LineBreakMode = UILineBreakMode.WordWrap,
  Lines = 0,
  Font = font,
  BackgroundColor = UIColor.Clear
};
Finally in our LayoutSubViews method we must compute the proper sizes for the bubbles and the text that goes in them. I made it so the bubbles did not take the entire space in a row. Instead they take 70% of the row to give a similar effect to the rendering of the iOS messages UI. The code is pretty straight-forward:
public override void LayoutSubviews ()
{
  base.LayoutSubviews ();
  var frame = ContentView.Frame;
  var size = GetSizeForText (this, label.Text) + BubblePadding;
  imageView.Frame = new RectangleF (new PointF (isLeft ? 10 : frame.Width-size.Width-10, frame.Y), size);
  view.SetNeedsDisplay ();
  frame = imageView.Frame;
  label.Frame = new RectangleF (new PointF (frame.X + (isLeft ? 12 : 8), frame.Y + 6), size-BubblePadding);
}