Building apps for the Retina Display
While adding Retina Display support to TweetStation I learned a couple of tricks that I figured would help other developers.
iOS 4 Points
Apple's Retina Display conveniently doubles the number of pixels on each dimension, the previous iPhone display had 320x480 pixels while the new new phone has 640x960 pixels.
To make existing applications run out of the box on these new displays Apple changed the units on the display and instead of using pixels they now use points. They are not really typographical points, but iOS "points". Both the old iPhones and the new iPhone have a resolution of 320x480 points.
This means that existing code that absolutely positioned views on the screen will get the views laid out in the same positions regardless of the device that the code is running on.
In UIKit points are interpreted based on the value of the UIView.ContentScaleFactor. If the value is 1.0 each point is mapped to one pixel. If the value is set to 2.0 each point is mapped to four pixels (2x on each dimension).
UIKit layout and CoreGraphics rendering primitives will automatically take this factor into account and position and render accordingly.
Images
The Image loading routines have been extended to load higher-resolution images by default when you use UIImage.FromBundle. On Retina Displays the code will probe for a [email protected] filename when you request file.ext to be loaded. For example this loads the background texture you use:
texture = UIImage.FromBundle ("Images/texture.png");
TweetStation's images are here.
Bitmaps and Inkscape
All the icons and images on TweetStation were done using Inkscape. When I exported the icons they would invariably look blurry. For example, this is from my first attempt at getting the swipe menu on TweetStation working:

I would just draw my icons on Inkscape and then export them as bitmaps. Inkscape would then anti-alias the result, you can see how the reply icon is not rendered properly:

The Inkscape FAQ contains this bit of information that is very useful if you are drawing small icons:
With the current renderer, it is not possible to completely get rid of antialiasing. However, it is possible to partially suppress it on export. Usually, antialiasing is unwelcome in horizontal and vertical lines which become "blurred". To work around this, make sure your horizontal/vertical edges are snapped on the pixel grid, and all strokes are a whole number of pixels wide. Then, export bitmap at the default 90dpi so that 1 px unit corresponds to 1 bitmap pixel. In the resulting bitmap, snapped color boundaries will be perfectly crisp.
These are the settings that I use now to export the same graphic:
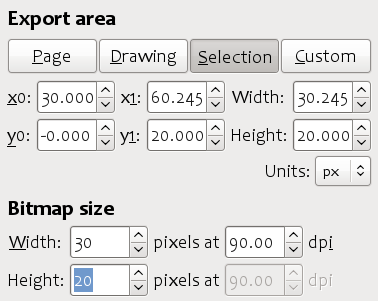
I used guidelines on Inkscape to help me:
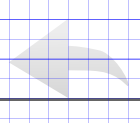
This is the new version of the icon before it gets composited with the background

To export the same image at high resolution, set the DPI in the dialog box to 180. Inkscape will automatically change the width and height for you.
The other problem that I had was related to my centering code, this is what the rewteet icon looks like from the menu above:

The blurry sides of the retweet icon were caused by the math code setting the X position of the image at a fraction of a point (0.5).
After fixing both problems and adding a nice backdrop shadow, this is what the menu looks like:

Graphics Context
Loading images with more pixels for the background texture and the icons wont do you any good if you are drawing the images yourself.
When you create a graphics context using the pre-iOS 4 APIs you will end up with a context that assumes that you are not aware of the Retina Display and hence will rescale your drawing up. When you create an image context of 100x100 points like this:
UIGraphics.BeginImageContext (new SizeF (100, 100));
You will end up with a context that has 200x200 points, but will automatically double all of your pen widths and will scale any images up. If you had a high-resolution image, it will first be scaled down when rendering to the context, then scaled up when rendering the data.
To take advantage of the retina display you need to call a new method:
UIGraphics.BeginImageContextWithOptions (SizeF size, bool opaque, float scale);
If you set scale to zero, it will pick 1.0 for old display and 2.0 for retina displays. I use this helper method to support both iOS 3.x and iOS 4.0:
	void BeginImageContext (SizeF size)
	{
		if (Graphics.HighRes)
			UIGraphics.BeginImageContextWithOptions (size, false, 0);
		else
			UIGraphics.BeginImageContext (size);
	}
This is how the swipe menu is rendered at high resolution:

More
Apple's Supporting Resolution Independence document has more information.
Posted on 20 Jul 2010
Blog Search
Archive
- 2024
Apr Jun - 2020
Mar Aug Sep - 2018
Jan Feb Apr May Dec - 2016
Jan Feb Jul Sep - 2014
Jan Apr May Jul Aug Sep Oct Nov Dec - 2012
Feb Mar Apr Aug Sep Oct Nov - 2010
Jan Feb Mar Apr May Jun Jul Aug Sep Oct Nov Dec - 2008
Jan Feb Mar Apr May Jun Jul Aug Sep Oct Nov Dec - 2006
Jan Feb Mar Apr May Jun Jul Aug Sep Oct Nov Dec - 2004
Jan Feb Mar Apr May Jun Jul Aug Sep Oct Nov Dec - 2002
Jan Feb Mar Apr May Jun Jul Aug Sep Oct Dec
- 2022
Apr - 2019
Mar Apr - 2017
Jan Nov Dec - 2015
Jan Jul Aug Sep Oct Dec - 2013
Feb Mar Apr Jun Aug Oct - 2011
Jan Feb Mar Apr May Jun Jul Aug Sep Oct Nov Dec - 2009
Jan Feb Mar Apr May Jun Jul Aug Sep Oct Nov Dec - 2007
Jan Feb Mar Apr May Jun Jul Aug Sep Oct Nov Dec - 2005
Jan Feb Mar Apr May Jun Jul Aug Sep Oct Nov Dec - 2003
Jan Feb Mar Apr Jun Jul Aug Sep Oct Nov Dec - 2001
Apr May Jun Jul Aug Sep Oct Nov Dec