Mono has migrated to GitHub
We have now migrated all of Mono's source code from the Subversion at our Cambridge office over to GitHub.
We are going to be maintaining a migration FAQ and providing help to developers on irc.gnome.org channel #mono for the new setup.
The web site has not been updated yet and we still reference Subversion urls, but this will be fixed in the next few days.
Posted on 22 Jul 2010
Mono 2.8 Trick: tracing exceptions
Mono has an strace-like feature built into the runtime. This is useful to see which methods are being called by your application, just invoke Mono with --trace.
Our upcoming version has a neat new feature, when you use --trace=E:ExceptionName or --trace=E:all you get a stack trace of where the exception was thrown from:
$ gmcs.exe
mono$ gmcs missing.cs
error CS2001: Source file `missing.cs' could not be found
Compilation failed: 1 error(s), 0 warnings
And now with tracing enabled, we do it setting the MONO_ENV_OPTIONS variable:
mono$ MONO_ENV_OPTIONS=--trace=E:all gmcs missing.cs[0xb75136f0:] EXCEPTION handling: System.IO.FileNotFoundException: Could not find file "missing.cs".

"{unnamed thread}" tid=0x0xb75136f0 this=0x0x53f18 thread handle 0x403 state : not waiting owns ()
  at System.IO.FileStream..ctor (string,System.IO.FileMode,System.IO.FileAccess,System.IO.FileShare,int,bool,System.IO.FileOptions) {0x00619}
  at System.IO.FileStream..ctor (string,System.IO.FileMode,System.IO.FileAccess,System.IO.FileShare) {0x00022}
  at (wrapper remoting-invoke-with-check) System.IO.FileStream..ctor (string,System.IO.FileMode,System.IO.FileAccess,System.IO.FileShare) {0x0004f}
  at System.IO.File.OpenRead (string) {0x0002c}
  at Mono.CSharp.Driver.Parse (Mono.CSharp.CompilationUnit) {0x00016}
  at Mono.CSharp.Driver.Parse () {0x00068}
  at Mono.CSharp.Driver.Compile () {0x00098}
  at Mono.CSharp.Driver.Main (string[]) {0x000a2}
  at (wrapper runtime-invoke) {Module}.runtime_invoke_int_object (object,intptr,intptr,intptr) {0x00033}
error CS2001: Source file `missing.cs' could not be found
Compilation failed: 1 error(s), 0 warnings
Posted on 21 Jul 2010
Banshee Ships with Amazon Store Support
Aaron just shipped Banshee 1.7.3 which lets you purchase MP3s from Amazon from the player directly.

Banshee Amazon MP3 Store
Screencast!
Get it fresh!
Posted on 21 Jul 2010
Building apps for the Retina Display
While adding Retina Display support to TweetStation I learned a couple of tricks that I figured would help other developers.
iOS 4 Points
Apple's Retina Display conveniently doubles the number of pixels on each dimension, the previous iPhone display had 320x480 pixels while the new new phone has 640x960 pixels.
To make existing applications run out of the box on these new displays Apple changed the units on the display and instead of using pixels they now use points. They are not really typographical points, but iOS "points". Both the old iPhones and the new iPhone have a resolution of 320x480 points.
This means that existing code that absolutely positioned views on the screen will get the views laid out in the same positions regardless of the device that the code is running on.
In UIKit points are interpreted based on the value of the UIView.ContentScaleFactor. If the value is 1.0 each point is mapped to one pixel. If the value is set to 2.0 each point is mapped to four pixels (2x on each dimension).
UIKit layout and CoreGraphics rendering primitives will automatically take this factor into account and position and render accordingly.
Images
The Image loading routines have been extended to load higher-resolution images by default when you use UIImage.FromBundle. On Retina Displays the code will probe for a [email protected] filename when you request file.ext to be loaded. For example this loads the background texture you use:
texture = UIImage.FromBundle ("Images/texture.png");
TweetStation's images are here.
Bitmaps and Inkscape
All the icons and images on TweetStation were done using Inkscape. When I exported the icons they would invariably look blurry. For example, this is from my first attempt at getting the swipe menu on TweetStation working:

I would just draw my icons on Inkscape and then export them as bitmaps. Inkscape would then anti-alias the result, you can see how the reply icon is not rendered properly:

The Inkscape FAQ contains this bit of information that is very useful if you are drawing small icons:
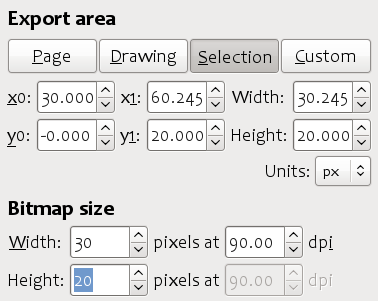
With the current renderer, it is not possible to completely get rid of antialiasing. However, it is possible to partially suppress it on export. Usually, antialiasing is unwelcome in horizontal and vertical lines which become "blurred". To work around this, make sure your horizontal/vertical edges are snapped on the pixel grid, and all strokes are a whole number of pixels wide. Then, export bitmap at the default 90dpi so that 1 px unit corresponds to 1 bitmap pixel. In the resulting bitmap, snapped color boundaries will be perfectly crisp.
These are the settings that I use now to export the same graphic:
I used guidelines on Inkscape to help me:
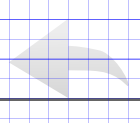
This is the new version of the icon before it gets composited with the background

To export the same image at high resolution, set the DPI in the dialog box to 180. Inkscape will automatically change the width and height for you.
The other problem that I had was related to my centering code, this is what the rewteet icon looks like from the menu above:

The blurry sides of the retweet icon were caused by the math code setting the X position of the image at a fraction of a point (0.5).
After fixing both problems and adding a nice backdrop shadow, this is what the menu looks like:

Graphics Context
Loading images with more pixels for the background texture and the icons wont do you any good if you are drawing the images yourself.
When you create a graphics context using the pre-iOS 4 APIs you will end up with a context that assumes that you are not aware of the Retina Display and hence will rescale your drawing up. When you create an image context of 100x100 points like this:
UIGraphics.BeginImageContext (new SizeF (100, 100));
You will end up with a context that has 200x200 points, but will automatically double all of your pen widths and will scale any images up. If you had a high-resolution image, it will first be scaled down when rendering to the context, then scaled up when rendering the data.
To take advantage of the retina display you need to call a new method:
UIGraphics.BeginImageContextWithOptions (SizeF size, bool opaque, float scale);
If you set scale to zero, it will pick 1.0 for old display and 2.0 for retina displays. I use this helper method to support both iOS 3.x and iOS 4.0:
	void BeginImageContext (SizeF size)
	{
		if (Graphics.HighRes)
			UIGraphics.BeginImageContextWithOptions (size, false, 0);
		else
			UIGraphics.BeginImageContext (size);
	}
This is how the swipe menu is rendered at high resolution:

More
Apple's Supporting Resolution Independence document has more information.
Posted on 20 Jul 2010
Mono's Git Migration
Mono's source code is being migrated to GitHub on July 22nd, starting at 9am Boston time.
We are psyched that Github was kind enough to host Mono's large repositories for free on their system. We are also taking advantage of their new Organizations functionality.
Gonzalo posted the following details about the migration:
We are moving our source code repository to GitHub.

On July 22nd ~9am EDT (1300 GMT) the subversion repository at "svn
+ssh://mono-cvs.ximian.com/source" will be set to read-only mode and
kept that way forever.

We estimate that the process of migrating all the projects and moving
them to GitHub will take more than 3 and less than 8 hours. Once it is
completed we will send an email to this list with URLs to the new
repositories, FAQs,...
If you have any questions about the migration, please ask them here and we will add them to our Git Migration FAQ.
Posted on 20 Jul 2010
Fresh Mono Baked
Andrew just announced Mono 2.6.7, the version that is replacing our long-term maintenance release of Mono with plenty of bug fixes as well as the following new features:
- Microsoft's ASP.NET MVC2 is now bundled with Mono.
- Upgraded xbuild tool (Mono's msbuild)
- Upgraded our LINQ to SQL (DbLinq)
- Upgraded our Soft Debugger
- We now publish CentOS/RHEL packages.
Our CentOS/RHEL packages install on /opt/novell/mono, just like our packages for SUSE Linux Enterprise and should not conflict with your own packages of Mono that you might have from some other sources.
Posted on 20 Jul 2010
Microsoft Licensing Changes for IronRuby and IronPython
If you check the latest versions of IronRubyIronPython or the Dynamic Language Runtime you will see that Microsoft has now relicensed the code from the Microsoft Permissive License to the Apache 2 License.
Posted on 17 Jul 2010
Spaniard Anger Towards Mexicans
It has been brought to my attention that the upcoming 200 year celebration of Mexico's independence from Spain on September 15th has lead to office unrest all across the country between teams that have both Mexicans and Spaniards working side-by-side.
Spain might have won the world cup, but Mexico upgraded from being a colony of Spain and being subject to the will of the Kings of Spain, to a democracy subject to the will of drug dealers.
To resolve this animosity, I propose we settle the score this September 15th with a cook-off between Spaniard food and Mexican food.
I propose the cook-off from the Novell/Cambridge team be held at my place the weekend before the festivities to settle the score before the celebrations take place. We will make delicious tacos. Gonzalo will be making a Paella.
Posted on 17 Jul 2010
New Mono Runtime Features
With Mono 2.8 we want to make it very easy for developers to use the LLVM powered Mono engine and the new Mono Garbage Collector.
Previously users had to build Mono from source code and choose as part of their build whether they wanted the Mono VM to be powered by LLVM or not and whether they wanted to use the Boehm GC or the new Generational GC. Typically users would have to keep multiple parallel Mono installations.
This is no longer necessary.
Mono 2.8 by default behaves just like any other Mono, by default you get the regular fast Mono JIT with the Boehm GC.
You can then pass the --llvm flag to instruct the Mono runtime to use LLVM for code generation (much slower to JIT, but produces better code for long-running applications or compute intensive applications).
To use the new garbage collector you pass the --gc=sgen command line argument.
New MONO_ENV_OPTIONS
We wanted users to try LLVM, SGen or the LLVM/Sgen combination without having to modify all of their launch scripts or existing tools so we introduced a new environment variable that Mono parses on startup, the MONO_ENV_OPTIONS variable.
Mono will parse the contents of the MONO_ENV_OPTIONS variable as if the arguments had been passed in the command line, so you could do a full bootstrap of Mono's class libraries with both by doing:
	$ export MONO_ENV_OPTIONS="--llvm --gc=sgen"
	$ make
How to test LLVM and SGen
Update: Both the --gc=sgen and --llvm options depend on your architecture and operating system being supported by SGen and LLVM and depend on you compiling your runtime with these features.
SGen will be automatically enabled if your OS/architecture is supported when you run configure.
LLVM requires the installation of the LLVM libraries. We strongly recommend that you use our modified version of LLVM that has been extended to support various constructs required by .NET.
For more information on compiling LLVM and building your Mono with it, see our web page
Posted on 14 Jul 2010
GZip your downloads
Gonzalo yesterday pointed me to a feature in the HTTP client stack for .NET that I did not know about.
If you want the server to gzip the response before sending it to you, set the AutomaticDecompression flag in your HttpWebRequest:
	var request = (HttpWebRequest) WebRequest.Create (uri);
	request.AutomaticDecompression = DecompressionMethods.GZip;
This will set the Accept-Encoding HTTP header to gzip when you make your connection and automatically decompress this for you when you get the response stream.
Update: on the comments there is a suggestion that Deflate is another option you can use, and you can combine both GZip + Deflate on the flags above.
Update2: Dennis Dietric emailed me to point out an important bit: if the server side does not support GZip or Deflate content, you will could get a 406 return code, so when dealing with third party web sites you need to be prepared to fall back and retry your request without compression in place. The relevant sections of rfc 2616 are 10.4.7, 14.1 and 14.3.
Posted on 09 Jul 2010
Microsoft MS-PL code in Mono
Over the past couple of years Microsoft has been open sourcing some key .NET libraries under the MS-PL or Apache 2 license.
We are tremendously grateful to Microsoft for making these components open source. This has allowed us to distribute this in the past, and we are going to be bundling a lot more of it with Mono 2.8:
In Mono 2.8, the following assemblies and code come from Microsoft:
- Managed Extensibility Framework, a framework to create extensible applications (blogged about their open sourcing).
- The Dynamic Language Runtime is the engine that powers IronPython and IronRuby, but also third party efforts like IronJS and RemObject's Javascript compiler. This lives largely in the System.Core assembly in .NET 4. Some of the code is also used in Mono's version of System.Numerics.
- OData's .NET client (System.Data.Services.Client), I blogged about this here.
- ASP.NET MVC both MVC1 and MVC2.
- Microsoft's AJAX library for use with ASP.NET WebForms.
- Silverlight's Controls, these are used by Moonlight.
With Mono 2.8 we are going to default to the .NET 4.0 profile. So from the list above MEF, the DLR, OData and MVC2 become first class citizens in Mono-land, no longer third-party packages that you needed to install.
Update: as of July 17th 2010, the DLR, IronPython and IronRuby changed their licenses from MS-PL to Apache2.
Posted on 07 Jul 2010
First MonoTouch Book is out
 I am very excited to see the first
MonoTouch book published.
I am very excited to see the first
MonoTouch book published.
You could not ask for a better team of authors to explain the MonoTouch and the iPhone platform. Chris, Craig, Martin, Rory, and Wally.
This book was a team effort by various active members of the MonoTouch community. They nurtured the community from the start by exploring MonoTouch, by reporting bugs and missing functionality in MonoTouch and by guiding .NET developers through the new world of building iPhone applications.
Congratulations on the book release guys!
You can find them here:
Posted on 06 Jul 2010
Pinta 0.4 Released
Jonathan Pobst has released a new version of his paint program, Pinta, a lightweight app that runs on Linux, OSX and Windows and is built entirely using Gtk#.
In this version, Jonathan added the MonoDevelop docking library to allow users to reorder the editing tools to match their workflow:

There are ready-to-run packages available for Windows, OSX, Ubuntu and OpenSUSE.
Posted on 06 Jul 2010
TweetStation: Elevating the Discourse
(See below for Updates).
 TweetStation
is my first native iPhone app (as opposed to my award-winning
HTML5-app iCoaster).
More screenshots can be seen here
TweetStation
is my first native iPhone app (as opposed to my award-winning
HTML5-app iCoaster).
More screenshots can be seen here
Just like Rails, TweetStation is an opinionated Tweeting client, it contains my personal blend of features that I enjoy from other twitter clients, but also tries to do something about changing the world.
TweetStation has been designed to elevate the level of discourse on Twitter.
At a conceptual level, this is achieved by applying the cardinal rule of not taking anything too seriously, specially any interactions you might have online.
At a practical level this is achieved with two features. The first feature plays back chicken noises whenever you request more Tweets (this is bound to the Tweetie-like "Pull to Refresh" feature). These chicken noises have been engineered to remind you that no matter how important an argument appears to be in Twitter, you should not take it too seriously.
Additionally, the chicken-noise-on-refresh serves as a cue to other people talking to you that you rather see what @jacksonh, or @Mickey__Rourke have to say than hear them parrot back the physics of clouds wikipedia page that they just read twenty minutes ago.
When you compose a message with TweetStation music starts playing back in the background. This music was specially selected to elicit in you the desire to write a witty and clever response as opposed to the usual "well, fuck you too" response seen too often on social media sites. The result will be the kind of tweet that your local newspaper would publish in the front page, or in their "Social Media Expert" column.
But there is an elephant in the room, and I want to speak directly about it. Many Twitteristas are concerned about the Tweetpocalypse and Twitter's transition to use some bizarro world non-feature called OAuth.
Tweetstation is feature packed and does not suffer from either problem. You can trust that Tweetstation was developed using the best engineering techniques available today, and that you will never be the victim of the Tweetpocalypse and be left incommunicado due to some silly programming mistake. Not in this 32-bit century, not in the next, and not under my watch. If my years of experience taught me one thing is and one thing only, it is when to use a 32-bit integer data type and when to use a 64-bit one. Do not fear dear user, I also master many other data types, but I digress.
But you might be wondering, why another Twitter client, and why now? As a twitterista you know that there is a special bond, an intimate bond if you will, between the twitterista and his twitter client. This bond can exist as long as both the twitterista and the twitter client grow hand in hand, if they co-develop. And I found myself at odds with the design decisions and paths that other twitter clients were taking. In a metaphorical way, I felt uncomfortable, like a Woody Allen character under pressure. But a character that lacked Woody Allen's command of the language.
And this is how TweetStation was born, it was a labor of love, but mostly of social awkwardness when my friends mocked my Twitter client for lacking a chicken noise, or when they suggested things at dinner like "would it not be cool if...". I decided to change all that, and make sure that other twitteristas in the future did not feel the social scorn that I had gone through, and this is why TweetStation's source code is on github.
Getting TweetStation
You can get TweetStation from iTunes.
Activating the Chicken Noises
By default, the chicken noises are off. To turn on this features, go to "Settings" and in the "Poultry" section set "Chicken Noises" to the "ON" position.
TrollStation Pro vs TweetStation
Since this is going to become a FAQ, I wanted to address this here.
I have two sets of keys that I got from Twitter to access the service using OAuth. One set of keys is the regular set of keys that anyone can get, and I attached the name "TrollStation Pro" to that one. This set of keys is what I placed on the public code on GitHub, so anyone can try and anyone can use. I reserve the right to change that name on a day-by-day basis depending on what I consider to be funny that particular day.
The second set of keys are labeled as "TweetStation" and that one is used for the actual application on the AppStore. These keys are special because Twitter was kind enough to give me access to their service using "xAuth" which improves the login experience (no web browser is involved).
Retina Display
TweetStation was submitted to Apple before I could get my hands on an iPhone4, so it is missing the high-resolution artwork. I just submitted a build that contains high-resolution icons for the iPhone4.
Updates
Login bug: There is a login bug if your password contains any special characters. I have submitted a bug fix to Apple (including the Retina display update). For now you can work around this issue by changing your password to use letters and numbers.
Posted on 01 Jul 2010
Blog Search
Archive
- 2024
Apr Jun - 2020
Mar Aug Sep - 2018
Jan Feb Apr May Dec - 2016
Jan Feb Jul Sep - 2014
Jan Apr May Jul Aug Sep Oct Nov Dec - 2012
Feb Mar Apr Aug Sep Oct Nov - 2010
Jan Feb Mar Apr May Jun Jul Aug Sep Oct Nov Dec - 2008
Jan Feb Mar Apr May Jun Jul Aug Sep Oct Nov Dec - 2006
Jan Feb Mar Apr May Jun Jul Aug Sep Oct Nov Dec - 2004
Jan Feb Mar Apr May Jun Jul Aug Sep Oct Nov Dec - 2002
Jan Feb Mar Apr May Jun Jul Aug Sep Oct Dec
- 2022
Apr - 2019
Mar Apr - 2017
Jan Nov Dec - 2015
Jan Jul Aug Sep Oct Dec - 2013
Feb Mar Apr Jun Aug Oct - 2011
Jan Feb Mar Apr May Jun Jul Aug Sep Oct Nov Dec - 2009
Jan Feb Mar Apr May Jun Jul Aug Sep Oct Nov Dec - 2007
Jan Feb Mar Apr May Jun Jul Aug Sep Oct Nov Dec - 2005
Jan Feb Mar Apr May Jun Jul Aug Sep Oct Nov Dec - 2003
Jan Feb Mar Apr Jun Jul Aug Sep Oct Nov Dec - 2001
Apr May Jun Jul Aug Sep Oct Nov Dec